
Chatbot's Diary: Enter the State Pattern

Encapsulating states in objects will reduce your chatbot's complexity and will improve testability.
I would like to demonstrate how to introduce more maintainability to your chatbots in case you decided to implement your chatbot as a state machine.
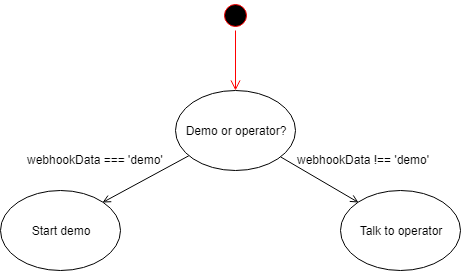
We will work with a very small example - 3 states only. Whatever input the chatbot receives, it will first ask if you'd like to talk to an operator or to see a demo. If you sent "demo" string to the bot, it will start the demo. It invokes "Talk to operator" in any other case.
Mess with if/else
When we received the first order to build a chatbot, our client asked us to implement a super simple chatbot. We decided to start coding directly and observe what patterns will appear. All decision logic was done using simple if/else. As you can imagine the code started to be a mess sooner than we expected. There was one more side effect - conditions became unnecessarily complex. Have a look at how the code looked like before refactoring:
async function onMessageReceived(webhookData) {
    if(webhookData === 'demo' &&
       this.lastState === states.OPERATOR_OR_DEMO
    ){
      return await chatbot.startDemo(webhookData)
    }
    if(this.lastState === states.OPERATOR_OR_DEMO){
      return await chatbot.talkToOperator(webhookData)
    }
    if(...) return await chatbot.doSomethingElse()
    if(...) return await chatbot.doSomethingElse2()
    // more ifs ...
}
We felt like we should encapsulate the states. For the next reading, remember especially the conditions containing this.lastState === states.OPERATOR_OR_DEMO.
Taming the state machine
I believe that if you start thinking about how to improve the design of your chatbot, the first thing which comes to your mind will be the State pattern.
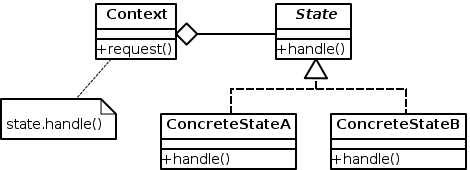
For our purposes, Chatbot will represent the context. The states, well, they will be the states. ;) Or in other words, the State class is a situation where the chatbot can find itself in.
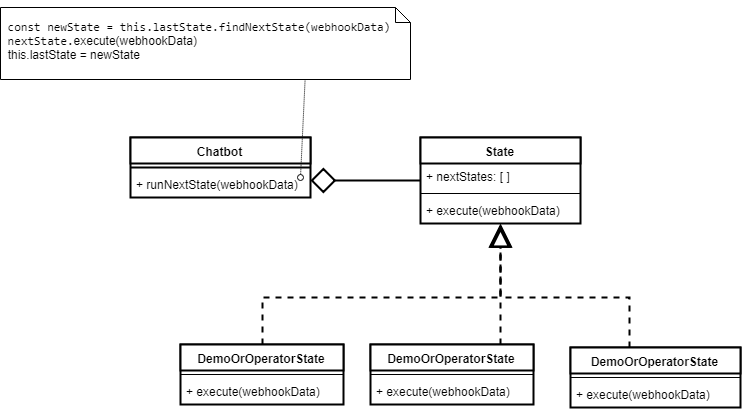
How does it work? Basically, every time you receive a message you let the chatbot decide what state to execute next.
async function onMessageReceived(webhookData) {
  await chatbot.runNextState(webhookData)
}
Each state will keep references to states it can transition to. This is how the parent state looks like in code:
class State {

  constructor() {
    this.nextStates = []
  }

  execute(webhookData) {
    throw new Error('It must be implemented in a child state.')
  }

  async findNextState(webhookData) {
    for (const {state, condition} of this.nextStates) {
      const canUseState = await condition(webhookData)
      if (canUseState) return state
    }
  }

  addNextState(nextState, condition) {
    this.nextStates.push({
      state: nextState,
      condition
    })
  }
}
Concrete state implementations specify what states can the chatbot transition to from the current state. In state.execute(), the state defines what it will do when it's executed. It can do more than one thing at a time. For example, it can fetch data from a 3rd party, print a message with buttons and send a typing notification all in one go.
Below is the implementation of a child state:
class DemoOrOperatorState extends State {

  constructor(){
    super()
    this.addNextState(startDemoState, webhookData => {
         webhookData === 'demo'
    })
    this.addNextState(operatorState, () => true)
  }

  async execute(channelId, contactId, webhookData){
    const message = 'Do you want to see demo or talk to one of us?'
    await amioApi.sendMessage(message)
  }

}
After refactoring
The refactored code encapsulates states in objects. Every state describes what it does and what are the next states the bot can move to. It's easier to reuse and add new states now.
Probably the biggest benefit of the encapsulation is that every transitivity condition contains only logic necessary to go from state A to state B. Before using the state pattern we had to take into account all possible side effects that can execute an unwanted state. For example, to be sure that receiving "demo" in the message will call only StartDemoState we had to addthis.lastState === states.OPERATOR_OR_DEMO. It is not needed anymore.
The states as objects are also easier to unit test. You can just test state.execute() and all it's state.nextStates conditions in isolation.
Farewell
We have internally developed a simple framework for Node.js. We use it on our chatbot projects. I hope that we will release it publicly soon. It will cover interceptors, postbacks, and some test utils too. In the meantime, you can save a link to our GitHub where we will publish our resources and the framework will be one of them.
Let us know what you think and if the post helped you!
Amio.io Team
